Tree House
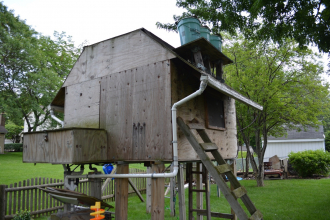
The final design is to the left but my original thought to build a tree house came from me placing a board over the parallel bars in elementary school on the gymnastics equipment that existed in my yard. These bars were 4 feet off the ground. The first board was small piece of plywood I had lying around at home. I then purchased a full sheet (8ft x 4ft) of 3/4 inch treated plywood. I would be using the same type of plywood for the entire structure. The plywood had to be cut to 3 feet wide since the bars were only about 18 inches apart. The full width of the plywood could not be supported safely if the board was left at 4 feet wide. This was my decision. I came to this conclusion because the small board I had first used was 4 feet wide and warped significantly when placed over the bars. The new 8-foot by 3-foot board was on the bars for roughly a year before I started building the first design of the tree house. This board became the floor.

Each plywood sheet of the roof was cut into two 4-foot square panels to reduce weight and the difficulty of lifting the sections into place. The panels were attached to the 2x4's using six bolts per panel (3 on each 2x4). I covered the peak of the roof with roofing shingles. Once the roof was in place, I cut a window in each 8-foot wall in the center. I reused the cutout to close the window using two hinges and a hasp to keep it locked. The cut out opened outward. It was necessary to cut the top section of the cutout off in order to for it to clear the roof when the window was opened. I put the removed top section on its own hinge with a bolt lock to maintain the security of the window (above, picture 5).
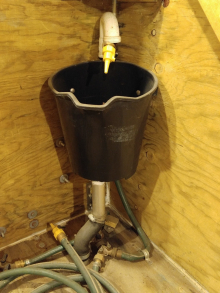
Once the structure was completed, I began adding amenities. I started with lights. I wanted something easy to install and fairly safe. At the time, I felt rope lights were the best option. Considering they are water proof and can be strung easily it was a good choice. Those lights were used until I expanded the tree house. When I first installed the lights, there was not a permanent electrical connection to the tree house. Every time I wanted to connect the lights I had to run an extension cord to the main home. After several months, I was given permission to run an outdoor extension cord up through the tree that was next to my tree house to our deck. This way I could connect the lights quickly, anytime I desired. I wanted to run permanent underground wiring to my tree house but that is expensive and a massive undertaking. Connecting an extension cord is not a large inconvenience and is still the system installed today. The other item I added was water. I wanted to have a sink and auxiliary hose for rinsing the floor and other uses. I could not run an underground water line either, so I used standard garden hose which I hooked up when I wanted water. The exterior connection went through the floor and attached to a ground support column. I modified a bucket for a sink and PVC P-trap (like in a sink) for a faucet (at left). A piece of garden hose was fed into the P-trap with a valve at the end. I cut a hole in the bottom of the bucket for the drain. The drain hole was
linked with a pipe which went through the floor down to the ground.

My next project was creating the ladder (right, picture 1) and winch for the floor entryway. I wanted the ladder to have the option to lift away from the ground to keep the underside of the tree house clear of obstacles. I built the ladder section first, no attachment of any kind, so I could figure out how to design the hinge attachment. The ladder was 1-foot wide, made from 2x4's. I looked available hinges and chose an 8-inch heavy duty gate hinge. I attached a section of 2x4 on the front and back, on the top of the ladder, to provide room for the hinge and bolts to connect (right, picture 2,3). I attached similar 2x4 sections to the underside of the tree house floor to provide the needed support for the weight of the ladder and user (right, picture 2). To keep the ladder in place when climbing, I created a rotating attachment on one side of the ladder that hooked onto a fence stake driven in the ground (right, picture 4). The attachment was made from two bolt hooks (used in large fence hinges) and two plates from a U-bolt. When I needed to lift the ladder the attachment is lifted (right, picture 5) and raised with the winch I created. Buying a winch was cost prohibitive and all I need was a spool and a crank to lift the ladder. My design used 2x4's and steel conduit pipe (right, picture 6). A piece of 2x4 was used for the spool. Two holes were drilled in the front of the spool to put the conduit through, which would serve as the crank and lock. Bolts were used as the axel for the spool and 3/16 inch braided steel cable was used to lift the ladder. Everything I have discussed so far was completed before I started high school.
The 3-foot side walls were installed first. My initial design to attach the side walls (all four) to the floor was to use 5-inch steel angle brackets every 8 inches. But I quickly learned that was very expensive. Having little experience in construction I discussed ideas with my father. I was given the idea to use triangles of wood in place of angle brackets (right, picture 1). I used that idea to attach the 3-foot sidewalls to the floor. Supporting the 8-foot sidewalls the same way was also not cost effective, nor would it be able to support the structure when the roof was attached. After discussing other solutions, I decided on using two 2x4 cross members to support each 8 foot side wall (right, picture 2). Each cross member would also attach to the 3-foot side wall and the floor. This provided the support to hold the walls against their own weight, additional weight from the roof and any other forces on the structure. Before I closed the walls, I cut a small door in the floor. Until I built the ladder, I would drop though this door onto the ground and jump up to get inside.
Since the roof is also plywood, I need to create a structure to support the plywood and connect it to the walls. Having some idea of how a typical real house roof is constructed (having visited my home's attic), I went with a similar design. Large beams weren't needed since the roof is only 2 sheets of plywood. I again used 2x4's. I decided on a simple pointed roof, each side perpendicular to each other. The supports were four sets of 2x4's (right, picture 3). The 2x4's were connected to the walls using bolts and 5-inch steel angle brackets I bent to a 30 degree angle (right, picture 4).
Once in high school I added a few more improvements. The first item was gutters (left, picture 1). When it rained, the water dripping from the roof was causing dirt to erode along the drip zone creating a small trench. The construction of my roof didn't allow typical gutters to be attached. I also didn't want to buy anything. We had used down spouts saved from when our gutters were replaced. I cut the down spout open along the seam and bent the sides to create a gutter shape. I folded a section along the length to make a flap to screw to the underside of the roof. I made more cuts to create flaps I could bend to close the ends of the gutter. A hole saw was used to cut a drain hole at one end of the gutter which I connected to a PVC fitting. To connect the PVC fitting to the gutter I cut a strip of aluminum flashing and wrapped it around the PVC fitting, with extra extending off the PVC. I cut flaps into the extra flashing. These flaps were bent to fit the shape of the gutter and riveted into place (left, picture 2). I used caulk to seal the connection. I ran a PVC from both gutters to the same pipe used for the sink (left, picture 3,4).
The next improvement was the addition (right, picture 1). The original build was very small. I could barely stand inside and it could only hold 2 people comfortably. In order to expand the tree house I needed to build another platform for more floor space. In the summer of 2009, I began digging post holes to support a new set of bars. I wanted to use a full size piece of plywood (8 feet by
4 feet), so I set the ground supports wider than the original. I decided the posts should be set 3 feet in the ground (right, picture 2) surrounded by cement. The soil is all clay after 1 foot, my thought was that depth with the cement would be more than enough to support the tree house and occupants. I dug the first two holes quickly with no problem. But after only a foot into the third hole I hit a rock. There was no option to move the hole. First I tried to break the rock since it only blocked part of the hole. but nothing worked. Then I decided to dig it out, thinking it was maybe a foot wide. It turns out it was a 4-foot by 5-foot by 6-inch piece of cement left in the ground (right, picture 3,4). The origin is completely unknown, but I would guess it is related to the fact that our town used to be farm land. It took until the summer of 2010 before I was able to put all the posts in the ground. The rest of the summer was spent building the addition. With the posts in the ground I attached the support bars. I used 1-inch by 2-inch cold-rolled steel tube. I was reusing one 8-foot wall and one side of the roof. When the floor was in place, I took off the front side of the roof, then removed the roof supports. The other side of the roof would be able to support its own weight. I took down the 8-foot wall and slid it over to the new location. I braced that wall while I attached the extension to the original 3-foot wall. Once the walls were installed, I put the original roof supports back on the 8-foot wall and connected it to the other roof supports with a new 2x4 beam (right, picture 5,6). This created a combination flat-gabled roof. After everything was installed, I moved on with other improvements.
There was a continual problem with bugs inside the tree house. The roof design left a large gap and the walls and windows were not perfectly sealed. My solution was to seal all seams with caulk, screen the roof gap and build screens for the windows (left, picture 2). Covering the roof gap was a slow process. I needed to cut screen for each section, staple it in place and seal the edges with clear caulk (left, picture 1). Creating window screens required I make a custom solution. I have no window frame, so I had to mount them on the wall. I used extra 3/4-inch plywood cut in 1.5-inch strips to make the frame of the screen. I inlayed flat angle brackets on the corners for support (left, picture 3). I stapled screen on the opposite side and used a 1/4-inch strip of 2x4 to cover the staples and frayed edge of the screen. To create a tight seal, I used keyhole hangers to keep the screen secured to the wall. I also wanted a way to slide the screen along the wall so I could open the window but not have to take down the screen. My design used a type of square clip washer attached to the top edge of the screen and a hanging door slid track.
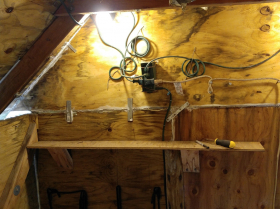
The next focus was improved lighting and shelving (at right). I installed four light sockets, one in each ceiling corner, plus I reinstalled the rope lighting across the ceiling. Adding shelves was my last project for my tree house before I began college. My shelves were basic but very functional. I used 1/2-inch plywood, 5-inches wide supported by 2x4s.
While I haven't used or performed work on my tree house in six years, I miss the building process. I have been thinking I would make improvements aesthetically and in safety so my new younger brothers could make use of my tree house. Instead of it sitting dormant, collecting dust.
