More About Me
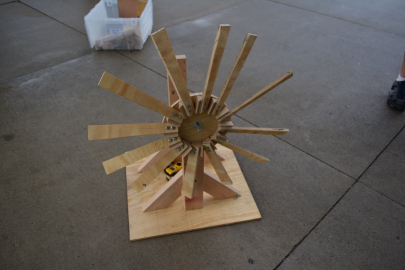
I have been involved in two windmill projects. The first was for my sophomore engineering design course at Iowa State University. The second was personal project which I will describe in a different section. In my design course, students were tasked with designing a product to improve or solve a problem for people in third world nations. The key design requirements were low cost, usability and ease of repair by the user. The products were not going to be sold free of charge, students need to create a theoretically viable business plan. The university provided a $100 budget per project to create a prototype for running tests. My group decided to design a windmill with a crank shaft axle to control a mechanical pump to draw water from wells. This would replace existing buckets or hand pumps. We set out to understand the basics of blades for a windmill: size, angle of attack and wind coverage area. We also designed the pump, a basic 2 stroke style. The test results and other relevant information are available to view by clicking the title above. Considering this was a course for my engineering it is very relevant to engineering. I learned about the design process: prototyping, multiple revisions, explaining changes, justifying costs, providing clarity to manufacturers and creating tests to prove a final design.

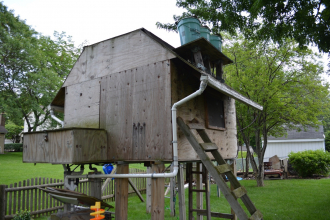
This isn't as much a tree house as it is a club house (since it isn't in a tree). The picture at the left is the final design. The construction was fairly basic. I used pressure treated plywood and 2x4's for support. My first design was built in late elementary school through middle school. The first design was 3 feet wide, 8 feet long, 5 feet high inside (at the maximum) and 4.5 feet off the ground. Windows were cut out on each of the long side in the middle. A door was cut in the floor on one end. I added a ladder to the underside attached with hinges to allow it to be hoisted out of the way for mowing the grass. There was electric lighting and a sink. Starting in high school I increased the size by more than 100%. It required I sink my own ground supports to support the additional floor space. I also added gutters, window screens, improved lighting, shelving and sealed the inside from bugs. After many years it is still in good shape. There might not be a strong connection to professional engineering but I believe it shows my ability to design and build functioning products even before a professional education. If you view the connecting page I explain my design choices and elaborate on the features I mentioned.
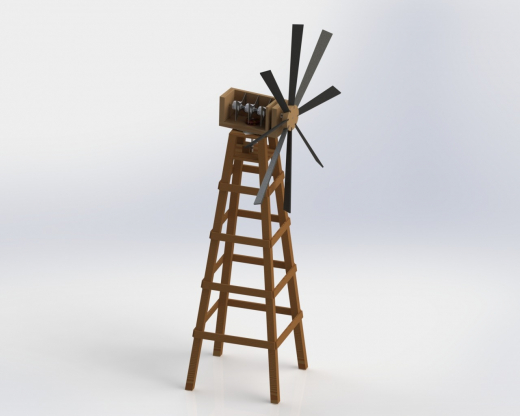
As I mentioned, I have a personal interest renewable energy. Even before the project in college, I wanted to build my own. But I didn't have the engineering knowledge or know where to start designing a windmill/turbine. After my university courses, I had a better understanding of electricity, motors, the design process and creating windmill blades. I performed additional research for more refined blade designs and understanding the particular motors I was using. The picture to the left is a CAD model I drew as a base for my first prototype build. I also modeled several other blade designs and motor configurations. The entire design was based around the motors I had. The motors were 3 previously-used, 35 volt, 2.8 amp stepper motors. I decided to direct-drive these motors since they are fairly small and low torque. It also reduced the overall complexity. Wood was used for the motor box and blade hub, sheet steel for the motor mounts, PVC pipe for the blades, both PVC and sheet steel were used for the slip-ring. Aside from fasteners and bearings, all parts were cut and shaped from stock material by my own hand. I also created a custom circuit board and wiring to rectify the power output from the motors. This project would easily be my most involved project in terms of research, design, use of engineering skills and fabrication.
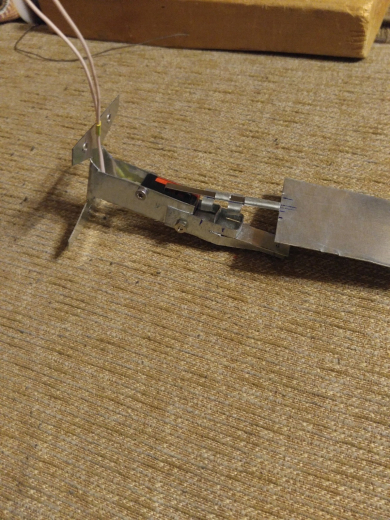
It may be difficult to see and understand from the picture to the left, but I will attempt to explain. The switch mechanism was to control the humidifier for my home's forced-air furnace/AC system. The issue was the humidifier did not have a system to check if air was flowing before running water through the humidifier filter. So, the humidifier would be using water nearly 24 hours a day in the winter, a massive waste of water and filters (which degrade and can become moldy with too much water). I was not aware of a known solution but creating a solution myself was no issue (and probably cheaper). The mechanism used a standard momentary switch and a large paddle to use air flow to trigger the switch. I mounted the mechanism inside the return-air duct which causes the paddle to be pushed downward while the blower motor of the furnace runs. The humidifier power circuit is connected through the momentary switch, allowing the humidifier to run only while air is moving. I would consider this a basic example of engineering. I saw a problem without an existing solution and used accessible materials to design and build a solution.
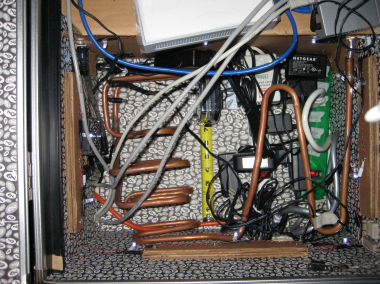
I have several network attached hard drives which I use for backups and other file storage. When I went to college I wanted to take those with me but keep them safe from thieves. I purchased a large storage trunk which I could lock, to keep my drives safe. But since electronics generate heat, I needed to remove heat without leaving the trunk open. Originally I had cut holes in several locations to mount a typical computer case fan to circulate air. Those were fairly noisy and could only do so much. I had read about liquid cooling and decided to create my own system for this trunk. I bent copper tubing to fit between each of the drives and over the power supplies. I cut a hole in the side of the trunk to connect the internal and external copper cooling coils. The intermediate fluid was mineral oil circulated by a small fountain pump. Between the liquid cooling and the case fans, the drives were kept at a reasonable temperature. The connection to engineering is my understanding of fluid flow and heat transfer.
Included in the slideshow to the left are three examples of carboard projects I have created. The first I will discuss is a two-level shelf I used in college for the four years I lived in a dorm. We had limited storage space and I desired more shelves. Using only carboard and hot glue, I assembled the shelves. It was mounted to the underside of my lofted bed. For the attachment I used string, popsicle sticks and a plastic package strap. It could be mounted or removed within several minutes and easily held 30 pounds continously.
The next project is a computer stand for my laptop. It is also only carboard and hot glue. It is preciously cut and glued to perfectly hold my laptop, slightly inclined for easier typing. All the ports are accesible while it is on the stand, even the DVD drive. There are three cutouts, one an each side, for airflow. As an extra, I wired three micro case fans to a modified USB connector to provide extra cooling power.
The final project is the house created for my cats. The house has 2 floors with a front door, a single light on each floor (provided by a "night light"), windows on each wall on both floors. The location of the cat house inside my house is next to an air vent, so I constructed a cardboard duct to direct the vent into the cat house on each floor. The entire structure is supported only by some form of cardboard and hot glue.
I feel there is a connection to engineering in the way I am able to understand the limits of a material and create a design to overcome those issues.
I have always enjoyed the process of problem solving and fabrication, long before I chose the path to become an engineer. I am fascinated by all types of mechanical machines and how they function. I love to disassemble and rebuild (or repair) a multitude of items. I have worked with many materials in different situations. My projects are a mix of solving existing issues and for personal enjoyment. When designing and doing research, computers and software play a large part in my projects. I use CAD software to create prototypes and evalulate design options. I have also created programming scripts to rapidly evaluate scenarios. Once I decide on a design, I refine it further in a CAD model and create drawing files to use in fabrication.
Open source, abstract image I like.
One of my personal projects is in the field of renewable energy. Solar and wind power are my main focus. In terms of solar, I am interested in assembling my own solar panels from purchased solar cells. I would solder the electrical connections for each cell, build the panel frames and wire the panels together. Then mount the panels on a roof in the sun. But wind energy has received the majority of my attention since the build costs are much lower. If you scroll further down this page you can view more information on my wind power project.
Besides projects involving mechanical design, I am interested in building computers, programming and web design. I have built my personal desktop computer and repaired my personal laptop. My experience in programming has been in academics and my personal interest. I have highlighted one project on this page. Web design was a tangent from my interest in programming and computers.
Each project is labeled with a title. I provide a brief description but the title is linked to another page where I have detailed information or more pictures on a DropBox gallery (hover on the link to see). The pictures can also be clicked to view a larger image. If you look above to the site menu, there are 2 additional items: 'Repairs' and 'Other Interests'. The 'Repairs' page is exactly as it sounds, it shows repairs I have performed that I consider notable. I enjoy repairing everything and anything; it really tests my problem solving skills. On the 'Other Interests' page I discuss personal hobbies outside of engineering.
I have written many programs for personal use and school work. I feel my program to encrypt text data is the most relatable to engineering. The original purpose of the program was to make a batch file (MSDOS) I created more secure. I was connecting an encrypted VPN server from the command line to sync files between my personal computer and my personal folder hosted by my university. The commands required I write my password in plain text inside the batch file. My computer was fairly secure but I wanted to try something more secure. The intention was store my password in an encrypted state then use the batch file to run my program to decrypt the password and connect the VPN. This way my password is not easily accessible.
The program uses the most common type of encryption: transposition or replacement of character values. It reads data from a basic text file, encrypts the data and writes the new data to a different text file. My original design used a known set of random numbers to change the ASCII value of the input characters. I also used a different known set of random numbers to change the order of input characters. After completing a functioning version I decided to add more features just for fun. I created three levels of encryption, added a user encryption key and a graphical interface.
I consider this project relevant since it shows my knowledge of programming and complex ideas. Creating programs or scripts to process data or test design scenarios is important for modern engineers.

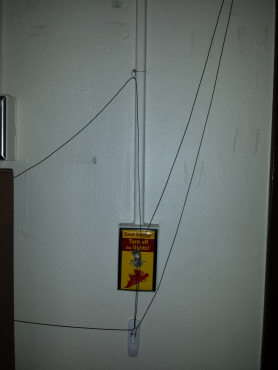
This was another project from my dorm room in college. It wasn't for any particular need, just something fun. I wanted to be able to control the room light from my bed which wasn't near the wall switch. The control mechanism uses string, paper clips, Command hooks and electrical tape. There were four strings, two for each roommate (one string being ON, the other OFF). It was designed to be disassembled after each year while lasting without failure but leave no trace on the wall or switch while also not blocking the normal use of the switch (ie directly by hand). It was successful and worked as intended. Command hooks together with bent paper clips were used to change the string's direction, like a pulley. This made it easy for the user to control the switch with a horizontal pull force from a distance. Paper clips were also used (with tape) to support the string along the wall and ceiling so it would not sag out of place.
After creating this design, I created an electro-mechanical mechanism to control any particular switch using a motor and push button switch. That design would require little effort of the part of the user and increase the distance the wall switch could be triggered. There may have been little practical value to this project but I wanted a solution that did not require modification of an existing wall switch. It is quick add on design. I also like to keep myself busy and test my skills. I did build a prototype but quickly realized you could not use the wall switch manually, a failure by my standards. I occasionally ponder new solutions, but I haven't put anything on paper.
1. Ventilation System
As a hobby, I have several cryptocurrency miners. When I first started in cyptocurrency I had one small machine, but as I became more involved I added more machines. The issue this creates is noise and heat; it becomes very significant. There are many solutions for that, such as a hosting center or pre-built venting systems. However, for either of those choices it adds more cost and complexity for the use and access of my machines. Instead, I designed and built my own. I went through several prototypes before I had something that functioned well. Reducing the noise was the easiest task for this project. One of the best and economical solutions is a double sheet of drywall and a product called GreenGlue. The higher density of drywall absorbs more of the sound waves and the GreenGlue creates a separation between two sheets to reduce vibration and lower frequency sound. Removing the waste heat was the most challenging. I initially under estimated the amount of airflow required to pull enough air out to keep the machines cool in the enclosed cabinet. This required me to redesign the ducts and exhaust system several times. The final design is in the pictures to the left. After I had a system that worked, I decided to reclaim some of the waste heat. My first thought was to send heat into the furnace in the winter to reducing heating cost. Then I realized I could also build a heat exchanger to preheat water for the water heater, also reducing power use. I’m currently designing a new system to fit into my new place. I expect it will perform better for sound reduction and heat extraction since I have a working prototype to use as a reference.